Mastering Grid Drawing: A Step-by-Step Tutorial

Introduction:

Grid drawing is a popular technique used by artists to create accurate and proportionate drawings.

It involves breaking down the subject into a grid of smaller squares, which helps with maintaining proper proportions and transferring details from a reference image.

In this tutorial, we will explore the grid drawing technique and guide you through the process of creating your own grid-based artwork.

Step 1: Selecting a Reference Image

Choose a reference image that you would like to draw.

It could be a photograph, a still life arrangement, or any other subject that interests you.

You can either find a picture online, or use a picture from your device's photo library.

Tap on the first button in the menu, to select your picture. The icon has an arrow pointing downward.

Make sure the image is clear and has sufficient details for your drawing.

Step 2: Setting Up the grid

Decide on the size of your drawing and how many squares you want to divide it into.

The number of squares will depend on the complexity of your subject and your desired level of detail.

Start with a smaller grid (e.g., 4x4 or 6x6) for simpler subjects, and increase the grid size for more intricate subjects.

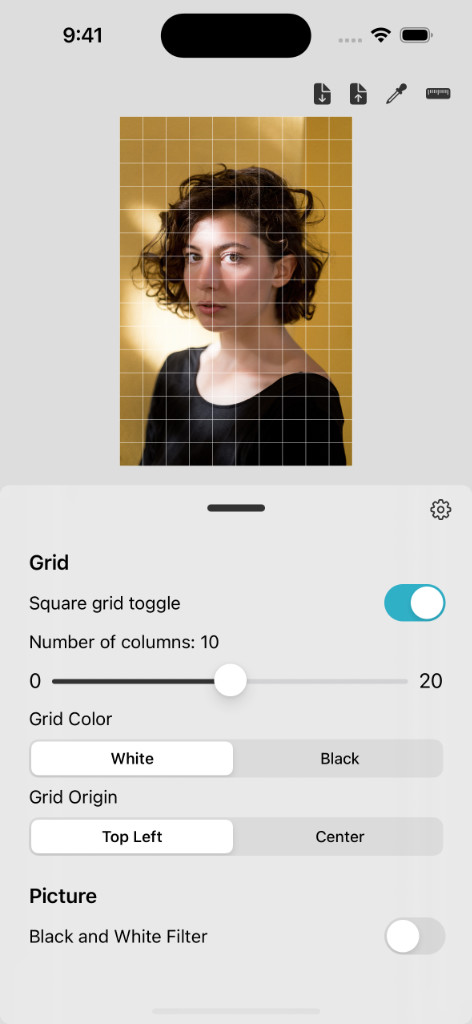
The grid settings are available in the bottom sheet. You can either drag it, or tap on the cog icon to open it.

You can select the number or squares, the grid color, and the grid origin. If you are using Procreate©, its grid origin is at the center by default.

Grid Settings

Step 3: Transferring the grid to your destination image

Now, it's time to draw an identical grid on your destination image. Ensure that the number of squares in the reference image matches the grid on your drawing surface. The grid on the reference image will serve as a guide to accurately transfer the details to your drawing.

You can use the scale calculator view to help you calculate the size of the squares on your destination drawing. To display the scale calculator, tap the button with a ruler icon.


If you are drawing on a physical medium:
Using a ruler and a light pencil, lightly draw a grid of evenly spaced squares on your drawing paper or canvas.


And if you are drawing on a digital medium:
Setup your software's grid properties using the size given by the scale calculator.
On Procreate, you can activate the grid in "Actions / Canvas / Drawing Guide" and setup the grid in "Edit Drawing Guide"

Scaling calculation

Step 4: Observing and Mapping the Details

Focus on one square at a time. Observe the details within that square of the reference image and replicate them in the corresponding square of your drawing. Take your time to carefully analyze the lines, shapes, and shading within each square. Pay attention to the relationships between objects and the overall composition.

You can zoom into the picture using the two-fingers Pinch to Zoom Gesture

Step 5: Drawing the Lines and Shapes

Using the grid lines as a reference, start drawing the lines and shapes within each square of your drawing. Begin with the basic outlines and gradually work towards adding more details. Take measurements from the reference image to ensure accuracy. You can use a pencil or any other preferred drawing tool.

Step 6: Refining and Shading

Continue working on each square, refining the lines and shapes, and adding shading to create depth and dimension. Pay close attention to light and shadow patterns in the reference image and replicate them in your drawing. Gradually build up the values using hatching, cross-hatching, or other shading techniques.

Step 7: Completing the Drawing

Once you have finished rendering all the squares, step back and assess your drawing as a whole. Make any necessary adjustments to ensure consistency and accuracy across the entire piece. Add final touches, refine any areas that need attention, and erase any remaining grid lines if you are using a physical medium or simply hide the grid otherwise.

Conclusion:

Grid drawing is a valuable technique that can help artists develop their observational skills and create precise drawings. By breaking down the subject into manageable squares, artists can maintain proportions and accurately transfer details. Remember to practice regularly and experiment with different grid sizes to enhance your skills. With time and practice, you'll be able to create stunning grid-based artworks.

Remember to enjoy the process and don't be too concerned about perfection. Art is about self-expression, and the grid drawing technique is merely a tool to support your creative journey. Happy drawing!